(continued from Excel Reports)
There are two available methods to run reports from the POS Station. One method is to run the RMReports module using the External Programs. This method produces the same RMReports screen that you see in the RM BackOffice Module and may be preferred for familiarity reason. The second method is to use the Full Reports function button typically found under the MISC function of the main POS status screen. The Full Reports screen bears little resemblance to the RMReports module screen but has the benefit of being designed specifically for ease of use at a touchscreen. In addition, Full Reports can be customized to limit reports viewed.
The RMReports module can be configured to run at a POS station by use of the External Programs feature found in the RM BackOffice module under Setup > General > External Programs. This allows you to view all the available reports, and to print those formatted appropriately (40 column) to the local receipt printer.
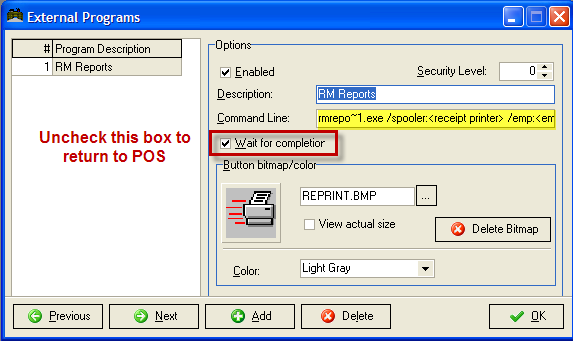
From the Restaurant Manager BackOffice create a new entry for an external program. Uncheck the wait for completion box (Note- if this boxed is checked you will not be able to return to the POS from RMReports). Enter the following command:
rmrepo~1.exe /spooler:<receipt printer> /emp:<employee> /noimport
Where:
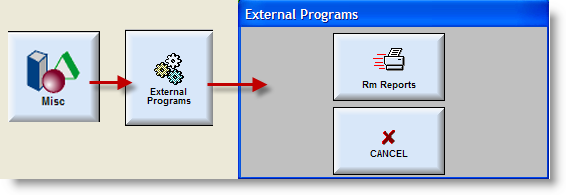
To access RMReports, touch the “External Programs” button under the Miscellaneous (Misc) options and select the button assigned to RMReports. RMReports automatically starts up in touchscreen mode when launched as an external program from the POS.
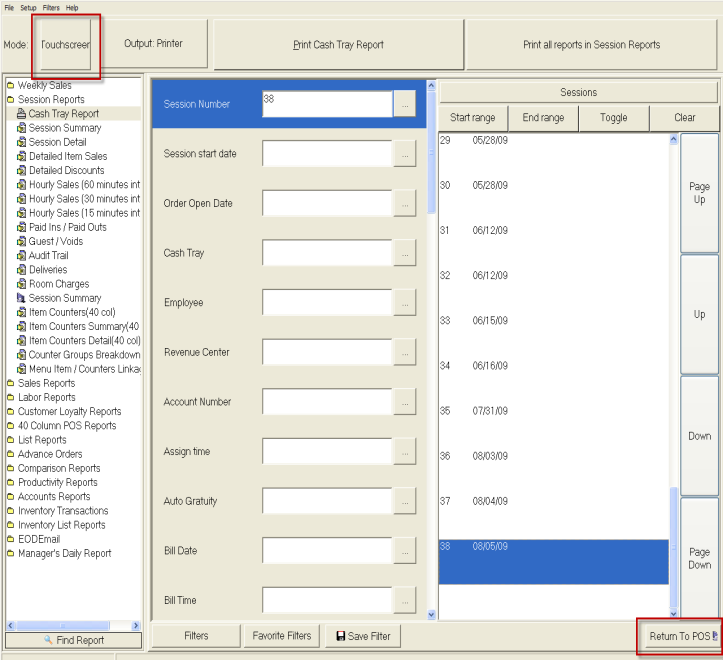
Using RMReports in touchscreen mode is not much different to using it in “mouse” mode. The filters work the same way, and you should be able to enter most conditions using the filter options in the right pane. To enter free text and numbers use the touch keypad that comes up when you touch the ellipsis buttons at the right of each filter field.
To exit back to the POS, touch the “Return to POS” button at the bottom right of the screen.
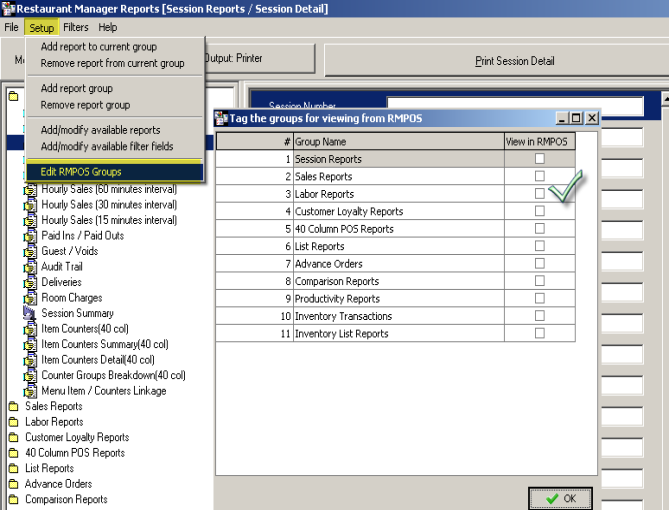
Full Reports at the POS is configurable to allow the user to setup specific report groups. The report groups can contain reports configured to produce user specific and relevant information. Passwords can be added for extra security and you can even limit what report groups are shown at the POS (shown below). Report groups must be marked as viewable first before they can be seen at the POS.
All back office reports are available at the POS by using the [Full Reports] function button in the MISC functions on the Main POS Status screen. Pressing the button will launch the RMReports module.
A special touch screen mode is automatically enabled that allows you to control the reporting without use of a keyboard. Although you won’t be able to print (only view on the screen) all of the back office reports on a receipt printer because of size and format limitations, you will be able to print the ones are formatted for 40 columns.
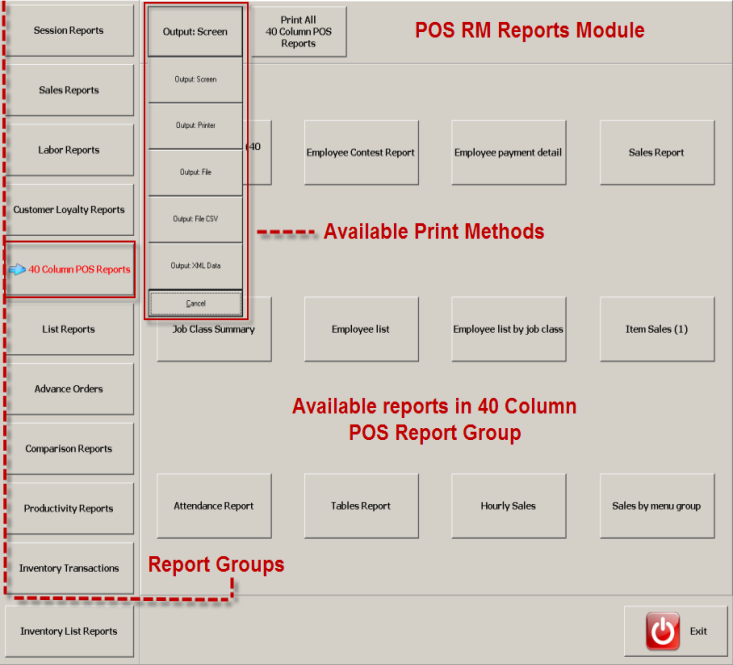
Once you have opened the RM Reports module, select a report group column on the left. You can print all reports in the report group by using the “Print All” function at the top of the screen or you can select a specific report within the group and use the “Print” function located on the upper right corner of the screen. You can determine the report output using the “Output” function and select the method” (e.g. print to screen or a printer).
If needed, you can re-define report filters in the RMReports module at the POS by selecting a report within a report group. By default, the report filters will default to “basic” mode. The [Show All Filters] button at the bottom of the screen will bring up all hard coded filters associated with the report. The [Show All Filters] button will change to [Basic Filters Only] when selected. You may toggle back to “basic’ mode by pressing the button again.
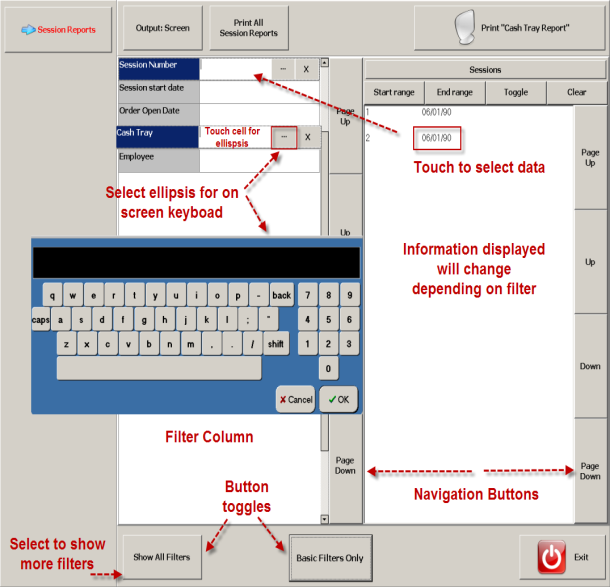
Filters are edited by touching a selection (Session Number) in the filter column. Next, you must select data displayed in the far right display area to move it to the chosen filter. You can use the on screen navigation buttons associated with a column to move up and down the screen. Certain filter may not have data to display in the display area. In this circumstance you can use the ellipsis button […] to use an on screen keyboard to enter data.
A number reports are available in 40 column format so that they can be printed on the standard receipt printers connected to POS workstations. To make these easier to access in touchscreen mode move the reports to a group at the top of the report tree (as shown below).
List of available 40 column reports
Delete this text and replace it with your own content.
(continued in Appendix I: ASI Type Reports (arf))